Who doesn't love Eric Carle's
"The Very Hungry Caterpillar?"
I love love love
Eric Carle's artwork, so much! And while looking at his photo gallery on how he made
a caterpillar collage, I played it on the computer with my graphic kit sampler.
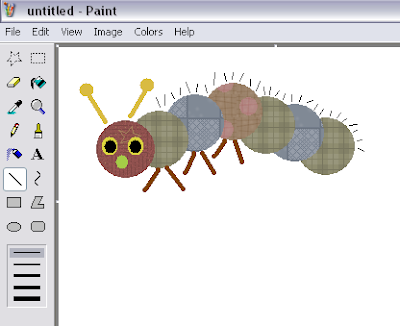
Here's how it looks when finished:

Not exactly like Eric Carle's, hehe, but hey, no original work can be repeated exactly like it is! It's a reason to invent your own creation. And keep getting inspired, somehow!
I thought you might want to know how I made it? Make sure that you have downloaded the graphic kit. If you haven't, click
here.
1/ With Microsoft Paint, open the files patterns01.bmp and patterns02.bmp, and open one more blank sheet on a new window. Make sure on the menu panel on the top that [ Image -> Draw Opaque ] is unchecked.
2/ Using the select tool, select the big ellipse pattern (as shown below) by keep pressing the mouse while dragging it diagonally, copy [ Edit -> Copy ] then paste [ Edit -> Paste ] it to the blank sheet on the other window.

3/ Repeat this step to the same pattern in different colours, then copy and paste them as many as you need.

4/ Now the fun starts! :-) Drag the big dots to form the caterpillar's head and body, also using the select tool. Just remember that with Microsoft Paint, the pattern you drag will be placed on top of the other patterns. Here's how I did it:

5/ Now using the ellipse tool, and you have to play with the colour tool as well, you can draw the eyes and the nose.
a/ click the ellipse tool, choose the fill only
b/ click on the colour you choose - if you don't really like the colour, double click and the colour tool box will appear. Click on the "Define Custom Colors" and click you mouse on the color you want. Click "Add to Custom Colors" and click OK

c/ still on the ellipse tool, click your mouse somewhere on the sheet and drag it diagonally to form a dot (in this case I made yellow dot) - approximately big enough to make the eyes (use Edit -> Undo or Ctrl + Z if the dot happens to be not the right size, then make it again). When you get the right one, make a copy of it so you have two yellow dots for a set of eyes.
d/ then I made a smaller dot, this time for the inner eye and nose. With the "fill with color" tool, I picked the color black and changed the color by clicking the bucket icon to the dot (you can also do it repeating how you make the bigger yellow dot, click on the ellipse tool then pick the color first, then draw the dot). Then I copied this smaller dot twice, and also using the fill-with-color tool, I changed the colour to green ( repeat step 5b to find the colour you like ).

e/ drag the yellow, black and green dots to the head of caterpillar, to form the eyes and the nose.

6/ Now time to experiment with the "line" tool. When you click on the line tool, the options for line thickness will appear. This time for the caterpillar's antennae, I choose the thickest one. I picked the color yellow again, and draw two lines up on the caterpillar's head ( click then drag, and voila, you get the line ). Then I clicked on the ellipse tool again and made two yellow dots, to top the antennae.

7/ Keep experimenting with the line tool... now pick another colour, for example brown, to make the feet (I still used the thickest line). Draw a few sets of lines down from the caterpillar's body.
8/ Then switch to the finest line, and pick yet another colour (I picked black) and draw tiny lines on top of the caterpilar's body.
9/ Finished!! Yeaaaa, you made it!!! :-))) Now, how to save it? You want to upload it to your own blog? or print it for your scrapbook?
10/ With Microsoft Paint, you can save your caterpillar graphicollage (that's how I call it!) to .bmp or .png or .tif and the graphic stays fine. I mean, if you save it as .gif or .jpg, the graphic will be deteriorated. The background will be white, except you put another colour to the sheet (using 'fill with color' tool), or you can place the graphic on top of another background tile (for example, use one of the 'papers' in the graphic kit), as shown below:

 NOTE
NOTE: always make sure that when you combine graphics like this, the "draw opaque" option must be unchecked, otherwise the white background from the selected area will appear.
11/ What if I want a transparent background? You will need to use other program, such as Adobe Photoshop. I copied and pasted the graphic from Paint to Photoshop -> click 'Layer' then 'Flatten Image' -> click 'magic eraser tool' (located on the same box as other eraser tools) and when the panel appear on the screen, uncheck all the options if they happen to be checked by default (anti alias, contiguous, sample all layers). Set the Tolerance box to 0 (zero) and opacity 100% -> Click the magic eraser cursor somewhere on the white background, then voila! you get the transparent background -> click 'File' then 'Save for Web' -> the box appear and choose the presets to GIF 128 dithered or PNG 128 dithered -> Click SAVE.
 NOTE
NOTE: if you want to use it for web graphic with transparent background, choose GIF 128 dithered. If you save the graphic as PNG, it's still has transparent background when you open it in Photoshop, but the background comes back to white if you use it on your website or blog. PNG file is ideal however for digital scrapbooking with Photoshop :-)
12/ I want to make a bigger caterpillar!! Don't worry! Just make new dot patterns, only this time, they should be bigger or even much bigger :-) Then you can repeat the steps above.
a/ start by making the pattern prototype for the "dot". Open the papers from my graphic kit in MS Paint. And open a new sheet in another window. Pick a color and click the fill-with-color tool to colour the worksheet (in this sample I picked the colour green).
b/ pick the colour white. Next, use the ellipse tool + fill only option (which appear at the bottom of the tool box when you click on the ellipse tool) and create a white dot, with the size you want.

c/ using the select tool, select a large area around the white dot. copy, and paste it to the papers (make sure the 'draw opaque' option is unchecked before pasting the dot graphic, otherwise the graphic dot will stay white instead of transparent)

d/ now pick the colour white, and using the fill-with-color tool, click on the green background, and voila! you get your big dot pattern. Select and copy the dot, then paste it to a new blank sheet in another window. Save. Repeat step 12c to other paper graphics.

 NOTE:
NOTE: when you close the paper graphics files, don't save changes them OK? choose "NO" when an option box appear before closing the file. Otherwise you have to download the graphic kit again ;-)
HELP!!! My caterpillar with the big dot patterns turns to be so big, larger than my computer screen that I can not select it!
Oh yes it's common problem with MS Paint. Just stretch the canvas / sheet, making it smaller or bigger, making it fit to the graphic, and after that, click Edit -> Select All and then Save the graphic. If you also use Adobe Photoshop, for example, you can just Select All then copy and paste it into Photoshop, and you can play with Image -> Image Size and make it to the size you want.
Ouuugh, do the steps above sound complicated? I hope not! This is just the steps I normally do when creating my graphics. Just practice and play often, and you will just get used to it. And the most important thing: enjoy, and have fun!! :-)))


